
If you are researching alternatives to the classic Inca Trail, you have likely come across the Salkantay Trek. It is frequently marketed by operators as the “wilder,” “more scenic,” and “more physically challenging” route to Machu Picchu. You will read stories of freezing high-altitude passes, dense cloud forests, and sweeping glacial valleys.
But stripped of the marketing speak, just how hard is it really?
For a hiker in good physical condition, the Salkantay Trek is not a technical mountaineering expedition. You do not need ropes, crampons, or prior high-altitude climbing experience. However, it is a significant, multi-day endurance test. The difficulty isn’t just about the steepness of the trail; it is a complex combination of total distance, dramatic terrain changes, wild temperature fluctuations, and the invisible wall of high altitude.
In this comprehensive guide, we break down the true Salkantay Trek difficulty, provide a day-by-day intensity profile, and share essential training and gear tips to ensure you reach the sun gate of Machu Picchu feeling strong rather than entirely spent.
1. The “Savage Mountain” Reality Check
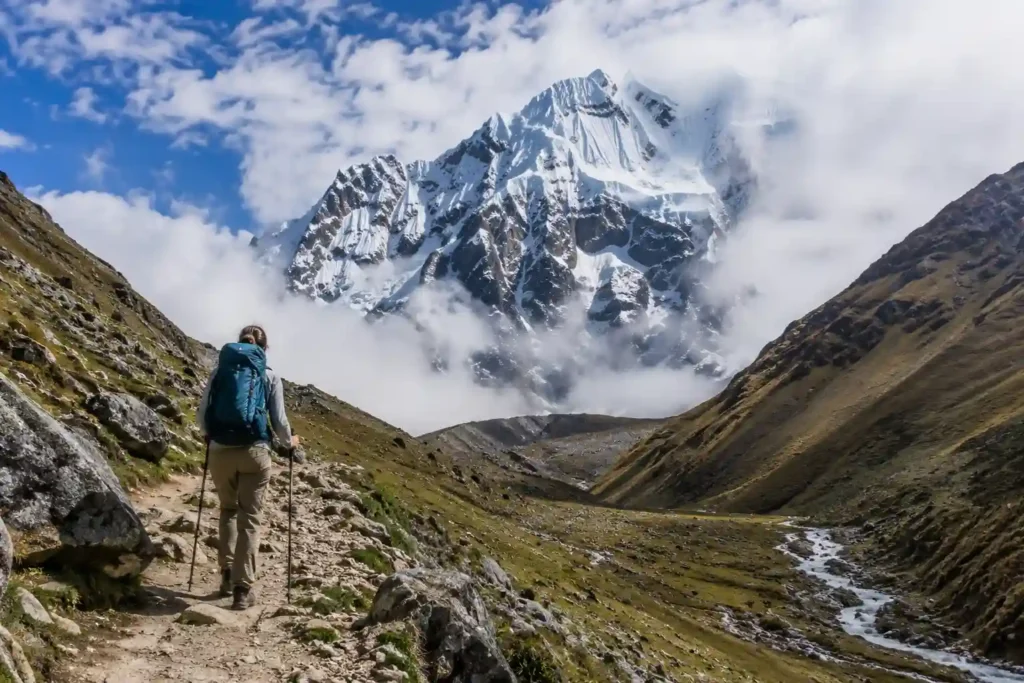
The name Salkantay comes from the Quechua word Sallqantay, which roughly translates to “Savage Mountain” or “Wild Mountain.” Standing at an imposing 20,574 feet (6,271 meters), this glaciated, jagged peak dominates the landscape throughout the first half of your trek.
While you won’t be climbing to the summit of the peak itself, you will be hiking right through its shadow. The crux of the entire journey is crossing the Salkantay Pass, which sits at a breathless 15,190 feet (4,630 meters) above sea level. At this elevation, there is roughly 40% less oxygen in the air than at sea level. Your lungs will work overtime, your heart rate will spike even while resting, and the weather can turn from blinding high-altitude sun to a whiteout snowstorm in a matter of minutes.
Is Salkantay Harder Than the Inca Trail?
This is the most common question prospective trekkers ask. The answer depends on what type of hiking your body tolerates best.
- Elevation: Salkantay goes significantly higher. The Inca Trail’s highest point, “Dead Woman’s Pass,” sits at 13,828 feet (4,215 meters). Salkantay pushes you almost 1,400 feet higher.
- Distance: The standard Salkantay Trek covers roughly 46 miles (74 km) over 5 days. The classic Inca Trail is shorter, covering about 26 miles (42 km) over 4 days.
- Terrain: The Inca Trail is notoriously grueling due to the literal thousands of ancient, uneven stone steps you must climb up and down. Salkantay features more natural dirt paths, gravel switchbacks, and steep scree slopes.
- The Verdict: Salkantay is generally considered more strenuous from a cardiovascular standpoint due to the sheer volume of miles and the higher maximum altitude. However, many hikers find it slightly less “impactful” on their knee joints because it lacks the mechanical, repetitive motion of the Inca Trail’s endless stone stairs.
2. Day-by-Day Difficulty Breakdown
To truly understand the physical demands, you have to look at the daily pacing. The Salkantay route takes you through multiple micro-climates, meaning the physical challenge changes completely from one day to the next.
| Day | Intensity | Key Challenge |
| Day 1 | Moderate | Steep acclimatization climb to Humantay Lake (4,200m) and adjusting to the thinner air. |
| Day 2 | Hard | The “Seven Snakes” switchbacks and the grueling ascent to the Salkantay Pass (4,630m). |
| Day 3 | Moderate | Long, continuous downhill descent into the cloud forest; navigating uneven, rocky terrain and increasing humidity. |
| Day 4 | Easy to Moderate | The 3-hour flat (but monotonous) walk along the train tracks from Hidroelectrica to Aguas Calientes; managing foot fatigue. |
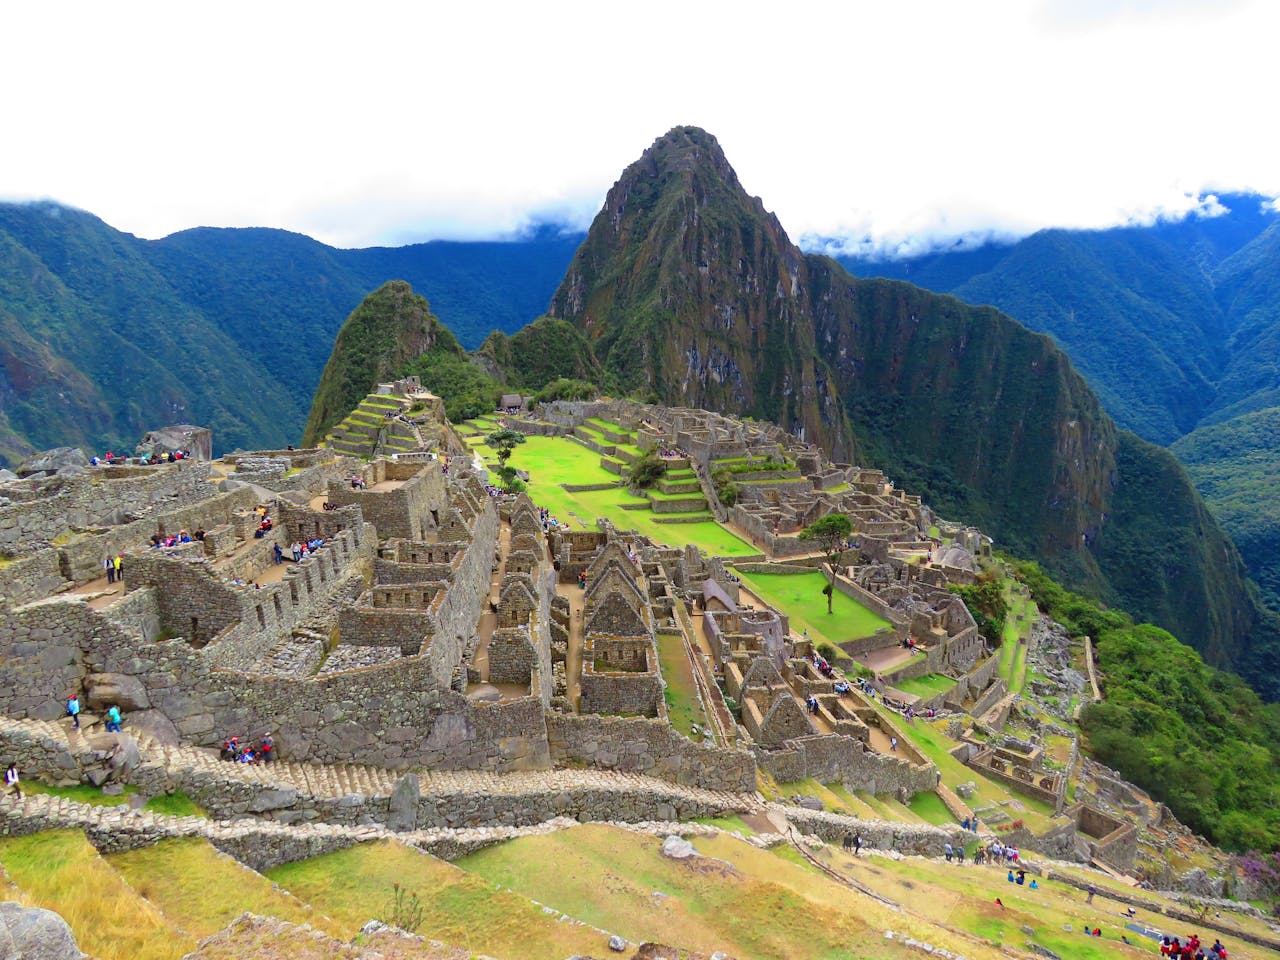
| Day 5 | Easy | The early morning stair climb up to the Machu Picchu entrance (unless taking the bus) and exploring the citadel. |
The “Day 2” Wall: Surviving the Pass
Day 2 is the trek’s undisputed “litmus test.” You will wake up in your tent well before dawn, usually to temperatures below freezing. After a quick breakfast, you begin the climb toward the pass.
The final push to the summit is known as the “Seven Snakes”—a grueling, steep series of switchbacks cut into the rocky mountainside. The air is extremely thin here; you will likely feel short of breath after just a few steps, your head may throb, and the wind coming off the glacier can be biting.
However, reaching the top is only half the battle. Once you crest the pass and take your photos, the 3-hour descent into the valley below is equally punishing on your quadriceps and knees. You will drop from a freezing alpine environment into a humid, buggy cloud forest all in the same afternoon.
Review the day-by-day pacing of our 5-Day Salkantay Trekking Adventure to see how our specific itineraries manage this intensity and build in rest periods.
3. The 3 Pillars of Salkantay Success
Failing to prepare is preparing to fail on this trek. Success relies on managing three critical pillars: Altitude, Physical Conditioning, and Equipment.
Pillar 1: The Altitude Factor (The Invisible Enemy)
Even if you are an elite marathon runner or cross-fit athlete at sea level, altitude can humble you. Physical fitness does not dictate how your body will react to thin air.
- Pre-Acclimatization is Mandatory: The most important step you can take is to spend at least 2 to 3 full days in Cusco (3,400m) or the Sacred Valley before starting the trek. This allows your body to naturally produce more red blood cells. If you fly into Cusco from sea level and start trekking the next day, your risk of severe altitude sickness (soroche) skyrockets.
- Hydration: At high altitudes, the air is incredibly dry, and you lose moisture rapidly simply by breathing. You must drink 3 to 4 liters of water a day on the trail.
- Pacing (Pole Pole): In the Andes, guides will often tell you to walk “poco a poco” (little by little). If you hike at your normal sea-level pace, you will burn out in 20 minutes. Keep a slow, rhythmic, sustainable pace.
- Medication and Remedies: Many trekkers consult their doctor for a prescription of Acetazolamide (Diamox) to aid acclimatization. On the trail, embrace local remedies—chewing coca leaves or drinking coca tea is a mild stimulant that significantly helps alleviate headaches and fatigue.
Pillar 2: Physical Preparation & Training
You do not need to be a professional athlete, but you absolutely need what hikers call “trail legs.” You should begin your training at least 8 to 12 weeks before your departure date.
- Stair Training: Because you will be climbing for hours on end, you need strong glutes and calves. Find the tallest stadium, public staircase, or office building in your city and climb it. Once that gets easy, do it wearing a weighted backpack.
- Cardiovascular Endurance: Aim for 30 to 45 minutes of sustained aerobic exercise (running, cycling, swimming, or brisk incline walking) 3 to 4 times a week for two months prior to departure. Your heart needs to be efficient.
- Leg Strength: Incorporate bodyweight exercises into your routine. Lunges, squats, and step-ups are incredibly effective at mimicking the muscle activation required for steep ascents and descents.
- Pack Weight Practice: If you are doing a supported trek (where horses or porters carry your main duffel), you will only carry a daypack. However, you should still train with a 15-lb (7kg) pack to simulate the weight of your daily water, camera, rain layers, and snacks.
Pillar 3: Equipment Strategy
The phrase “there is no bad weather, only bad clothing” applies heavily to the Andes. Your gear will make or break your comfort.
- Trekking Poles are Not Optional: For a trek with this much elevation gain and loss, trekking poles are practically mandatory. They act as “four-wheel drive” for your body. They help distribute weight on the uphill and, more importantly, they save your knees from absorbing the full impact on the brutal downhill stretches.
- Footwear: Wear broken-in, waterproof hiking boots with excellent ankle support. The trail is rocky and uneven. If you show up with box-fresh boots, your feet will be shredded with blisters by the end of Day 2, making the rest of the hike miserable.
- The Layering System: Because you will walk through snow and jungle on the same day, you need layers. A moisture-wicking base layer, a thermal mid-layer (fleece), an insulating layer (down jacket), and a high-quality wind/waterproof outer shell are essential.
Need a full, comprehensive checklist of gear to prepare for the trail? Check out our Ultimate Trekking Packing List.
4. The Mental Game
Finally, do not underestimate the mental aspect of the Salkantay Trek. There will be moments—likely halfway up the switchbacks on Day 2, or during a sudden freezing downpour—where you will question why you paid money to do this.
Mental toughness is just as important as physical fitness. Prepare yourself for discomfort. You will be sleeping in cold tents, you won’t shower for a few days, and your muscles will ache. But keeping a positive attitude, trusting your guide, and leaning on the camaraderie of your trekking group will push you through the hardest miles.
Conclusion: Is It for You?
The Salkantay Trek is undoubtedly a “challenging” adventure, but it is highly accessible. If you are reasonably fit, dedicate time to proper training, invest in good footwear, and deeply respect the acclimatization process, you can conquer the Savage Mountain.
The physical toll is temporary, but the reward—walking from the frozen glaciers of the high Andes down into the lush, tropical coffee plantations before finally arriving at the legendary citadel of Machu Picchu—is a profound journey that very few other trails on Earth can offer.